

Step-by-step guide to using the Spasilen Universal auto-injector
Intended use of the “Spasilen” medical device:
for intramuscular and subcutaneous administration of a pre-drawn injectable medication using standard disposable syringes with a volume of 3 ml and 5 ml.
Indications for use:
The need to administer medications intramuscularly or subcutaneously at home by users, including those without medical education or sufficient qualifications.
Contraindications for use:
- Damaged skin at the injection site, including the presence of infiltrates and hematomas at the injection sites;
- The patient having severe cognitive impairments;
- Alcohol or drug intoxication of the user.
Video instructions for performing injections using “Spasilen”

Preparing for the injection
Wash your hands thoroughly with soap and dry them.
Prepare the following materials:
- A disposable 3 ml or 5 ml syringe with a needle;
- An ampoule or vial with the medication;
- 2–3 alcohol wipes;
Drawing up the medication

- Wash your hands thoroughly with soap and dry them.
- Treat your hands with an antiseptic.
- Use an alcohol wipe to clean the surface of the ampoule or vial containing the medication.
- Break off the tip of the ampoule, or remove the protective cap and the aluminum tab in the center of the vial lid.
Drawing up the medication

- Carefully, without compromising sterility, insert the needle with the syringe into the ampoule or vial and fill the syringe with the solution, slowly pulling back the plunger.
- Holding the syringe with the needle pointing up, expel the air bubbles from the syringe and make sure no air remains in the syringe.
- Put the protective cap back on the needle.
Choosing and preparing the injection site
To choose injection sites, we recommend consulting your attending physician.
The injection site must be free of infections, skin lesions, scars, birthmarks, bony prominences, large blood vessels, or nerves.
Thoroughly clean a large area of skin at the chosen injection site with an alcohol wipe.
Sites for intramuscular injections
The following body sites are suitable for performing intramuscular injections:
- the gluteus maximus muscle,
- the vastus lateralis muscle of the thigh,
- the rectus femoris muscle,
- the deltoid muscle of the upper arm.
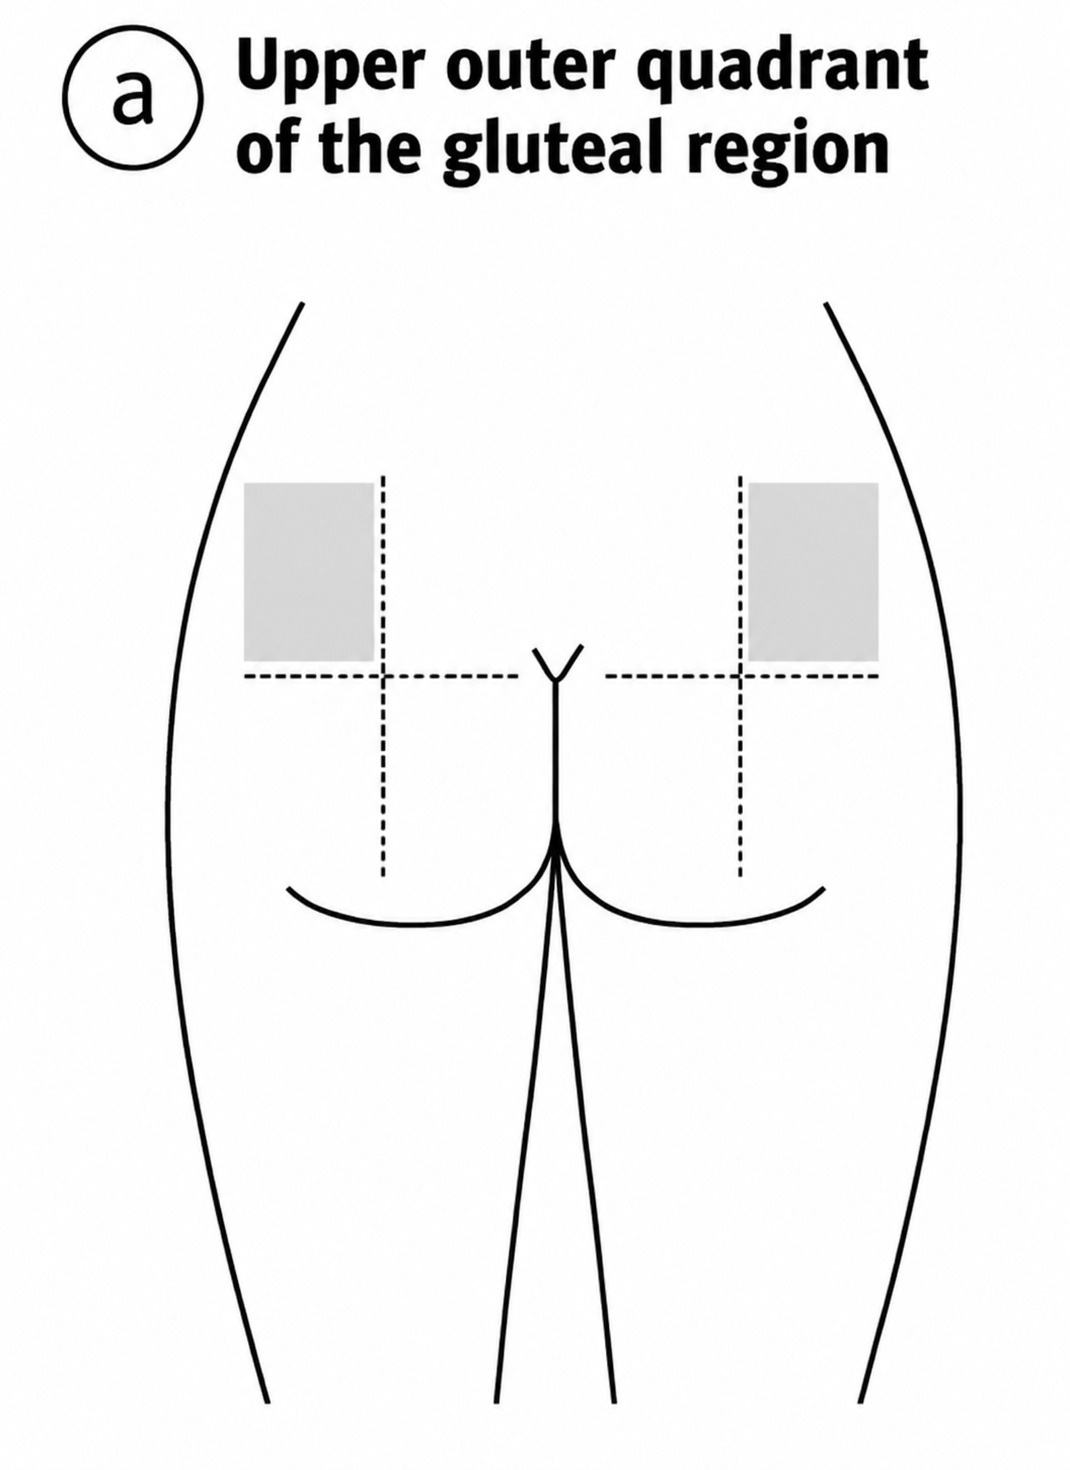
Gluteal region, gluteus maximus muscle (upper outer quadrant of the buttock)
To identify this area, draw an imaginary horizontal line from the start of the gluteal cleft to the greater trochanter of the femur. Then draw another imaginary line vertically through the middle of the previous one; the upper outer quadrant of the buttock will be located at the top.
Vastus lateralis muscle of the thigh and rectus femoris muscle
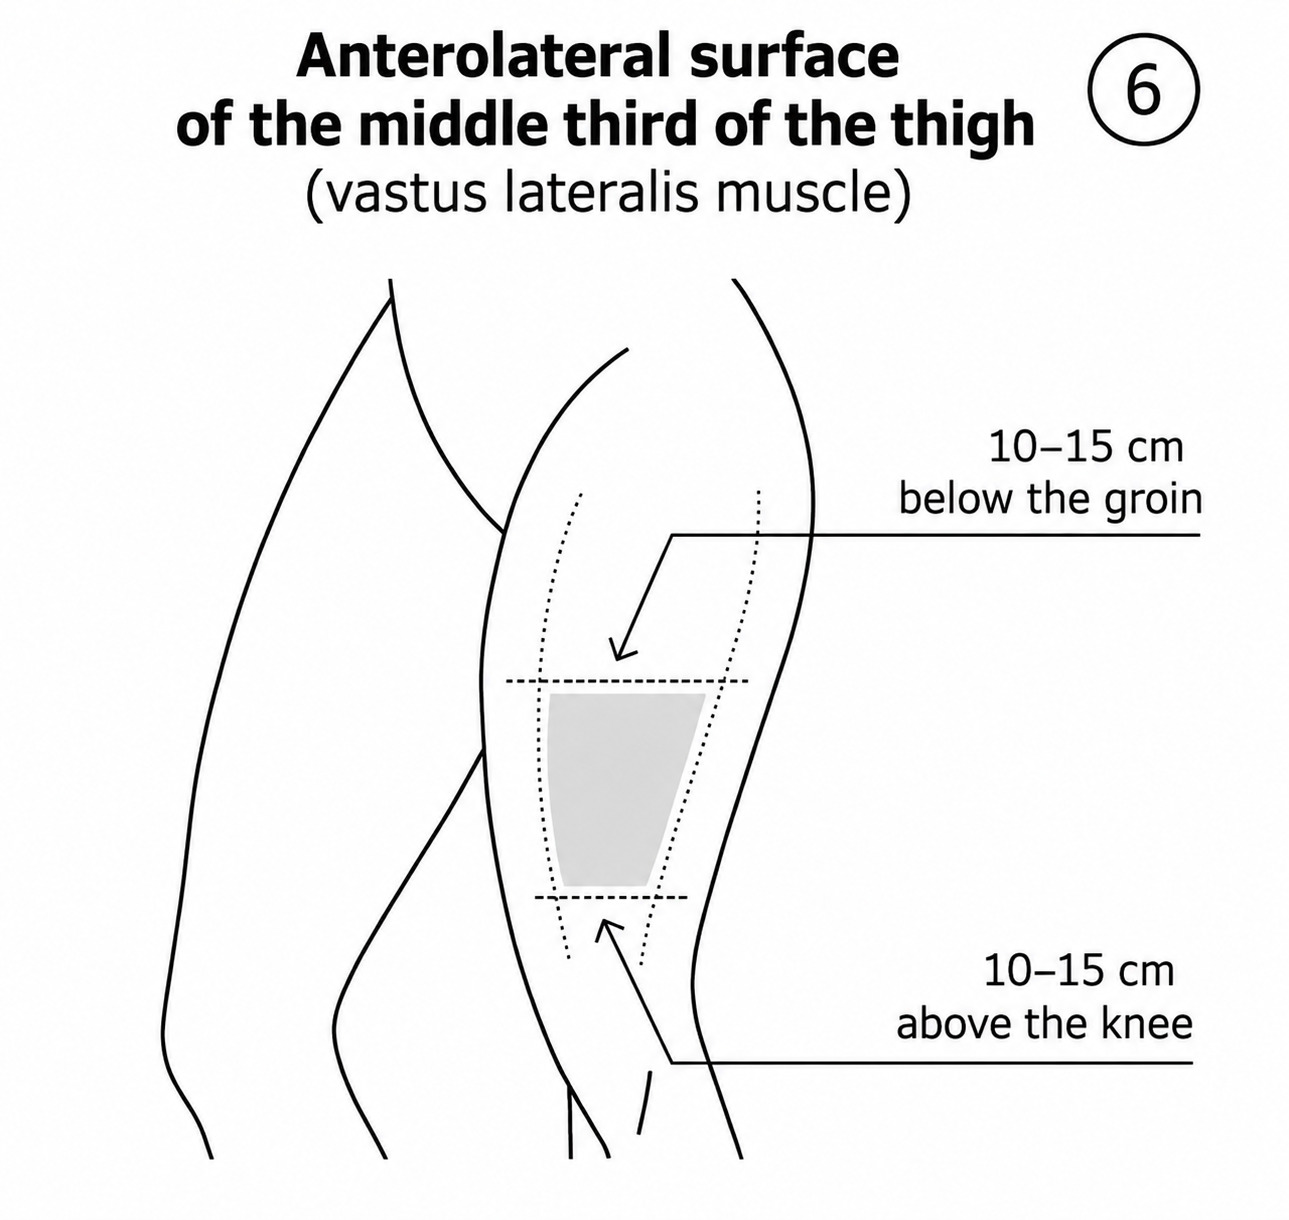
In adults, the injection sites in the vastus lateralis muscle of the thigh are determined as follows: one hand’s width (of an average person) below the greater trochanter toward the front surface of the thigh, and one hand’s width above the knee, in the middle third of the quadriceps femoris muscle. The rectus femoris muscle is located in the middle third of the front surface of the thigh.
- Volume of medication administered: from 1 to 5 ml.
- Needle insertion depth: depending on the patient’s muscle mass, typically from 15 to 25 mm, but no more than 35 mm.
Sites for subcutaneous injections
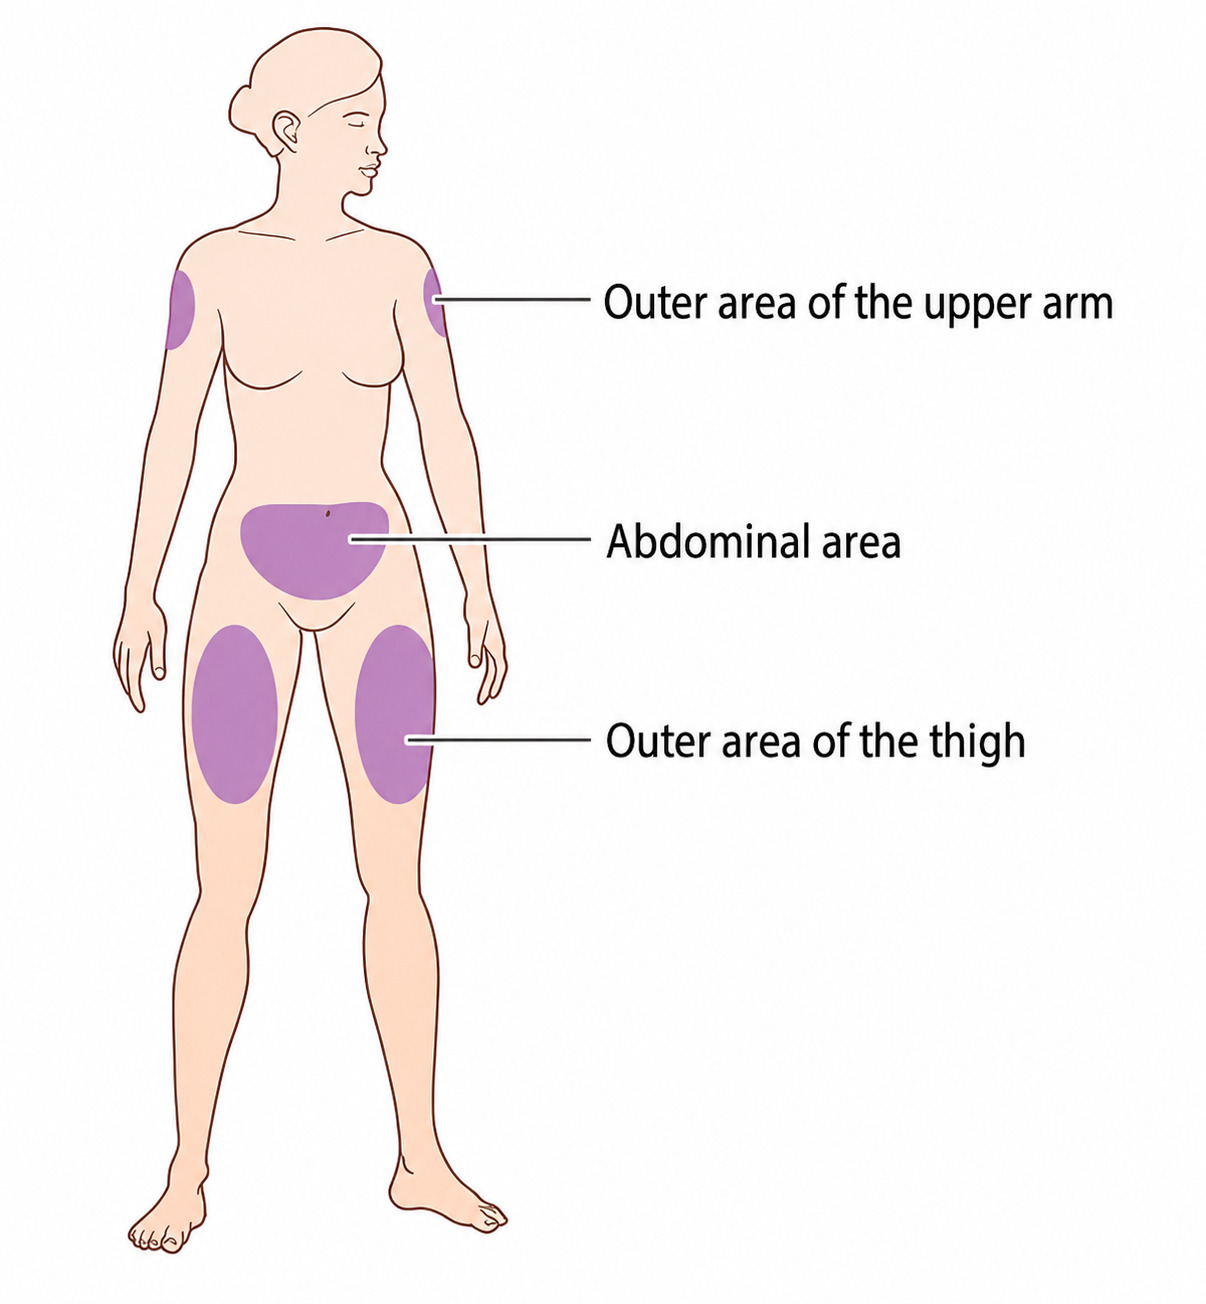
The following anatomical areas are suitable for performing subcutaneous injections:
- the lateral surfaces of the upper arm and thigh;
- the umbilical region of the abdomen.
Volume of medication administered: up to 1 ml. Needle insertion depth: from 4 mm to 15 mm.
How to properly prepare the injector for use with disposable syringes
How to set up the injector for your syringes:
Step 1. Insert the syringe into the cartridge.
Open the injector lid. Remove the cartridge from the injector by pulling both upper “tabs” of the cartridge at the same time (Figure 1).
Insert the syringe into the cartridge so that the flange (wings) on the syringe barrel fits into the longitudinal groove of the cartridge (Figure 2).
Make sure the syringe sits evenly and snugly (it does not wobble or sit askew).

Step 2. Insert the cartridge with the syringe into the injector

Hold the cartridge with the syringe at an angle of ~30–45° (Figure 3)

- First, bring the syringe plunger stop right up against the syringe plunger pusher (Figure 4).
- Now lower the cartridge and insert its legs into the holder slots until they click.
Step 3. Perform a “dry test” (setup check)

- Remove the syringe from the cartridge.
- Raise the syringe plunger pusher all the way up (cocking). Figure 5.
- Lower the lifter all the way down (cocking).
- Insert the syringe, with the cap on the needle, back into the cartridge.

Press and hold the safety button with your finger and, without releasing it, press the trigger button. Fig. 6
What should happen:
First click — needle insertion (a simulation; the needle is still in its cap).
Then a steady delivery follows.
Second click — automatic needle retraction.
If you heard two clicks, the setup is correct and the injector is ready for use with this syringe size.
If something went wrong:
No second click — the cartridge is not snapped all the way in, or the pusher/lifter is not cocked. Repeat steps 1–2.
If, after re-doing the setup, the needle retraction mechanism still does not work, record the setup process on video and contact the manufacturer. Contact details are provided at the end of the Instructions for Use.
When to repeat the setup.
If you keep using the same syringes (same batch), setting up once is enough. If you use syringes from a different batch/different manufacturer, repeat the setup (steps 1–2).
Administering the medication with SPASILEN
Step 1
a. Before using the injector with a new syringe size, set up the injector as described in the section “How to properly prepare the injector for use with disposable syringes.”
b. Wipe the outer surfaces of the injector and the needle cap remover with an alcohol wipe.
Step 2

a. Raise the syringe plunger pusher all the way up (cocking).
b. Lower the lifter all the way down for an intramuscular injection, or to the first click for a subcutaneous injection.
Step 3
a. Insert the filled syringe, with the cap on the needle, into the injector.
b. Close the injector body with the lid.
c. Insert the needle cap remover until it clicks.

Step 4
a. Wipe the end of the injector that contacts the injection site with an alcohol wipe, without removing the needle cap remover.
b. Remove the protective cap from the needle using the cap remover, without touching the injector with your fingers.
c. Clean the injection site with at least two wipes or swabs moistened with antiseptic solution.

Step 5
a. Press the injector against the intended injection site at a right angle (90°), with the safety-guard end facing the skin.
b. Press the trigger button. The trigger button will not activate if the injector is not pressed firmly enough against the injection site.
c. After the trigger button is pressed, the needle insertion mechanism activates (first click). The medication is then delivered. Next, the needle retraction mechanism activates (second click). The injection is complete.
d. Press a wipe or swab with antiseptic solution against the injection site. Without lifting your hand, gently massage the area where the medication was administered.

Step 6
a) Open the injector lid, remove the syringe from the cartridge (the cartridge must stay in the injector), and put the protective cap back on the needle. Dispose of all used single-use consumables according to their safety class.
c) Wipe all surfaces of the injector with alcohol solution or an alcohol wipe. The injector is ready for the next procedure.
Still have questions?
- Get a free consultation from a qualified nurse. She will tell you about the capabilities of the Spasilen automatic injector and answer your questions.
- Our consultation is available Monday through Friday from 9:00 to 17:00 (Moscow time).
Get a consultation
Reach out to us directly via your preferred messenger or by phone: